1. Logging into C-Meeting
Go to the C-Meeting website through your web browser www.c-meeting.com
Select Log in and enter your C-Meeting credentials:

2. Creating your C-Meeting
Toggle content goes here, click edit button to change this text.
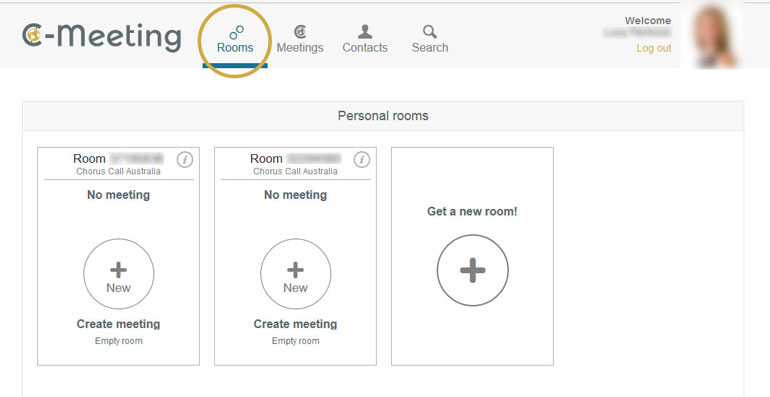
Click Create meeting:
(You will then be given the option to repeat the settings for the last meeting you held, or alternatively create a brand new meeting)

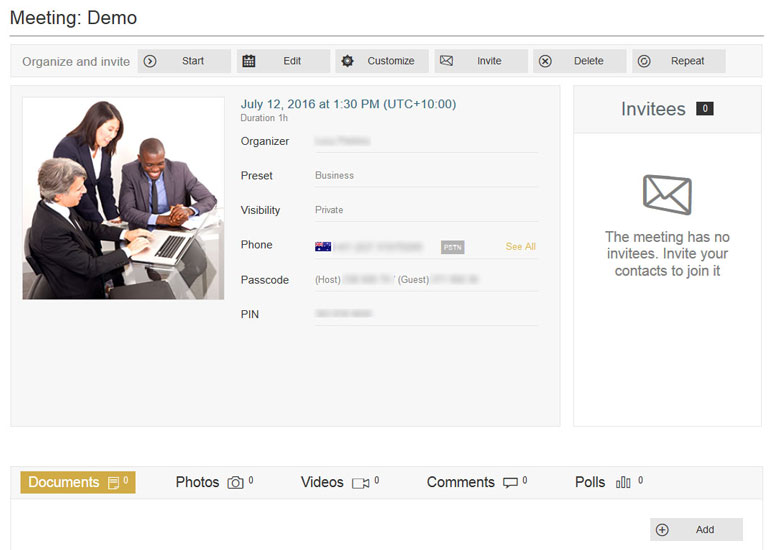
Input the details of your meeting:
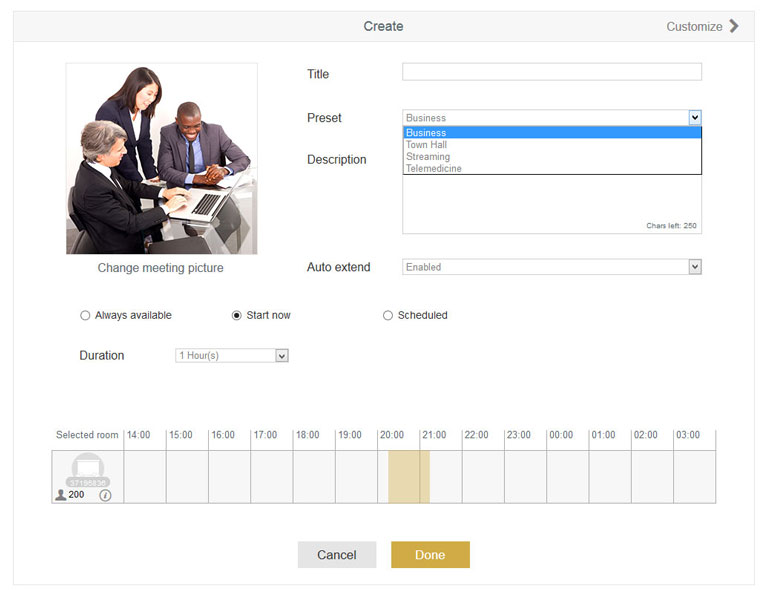
Title: Input the title for your meeting
Preset: This determines the setting for your meeting, (but can be customised further), ie:
- Business: An interactive mode where delegates participate in the meeting both verbally and logistically.
- Town Hall: A listen and view only mode for delegates, with minimal interaction capabilities
- Streaming: A listen and view only meeting for participants
- Telemedicine: Optimal settings for a two person interaction
Auto-Extend: Your meeting will terminate at the end of the duration you have set, unless you utilise this setting to allow for a more flexible time frame
Scheduling: Decide on the timing for your meeting.
- Always available: Your participants can utilise the meeting room at any time
- Start now: Activate your meeting and alert your invitees that the meeting room is open
- Scheduled: Select the date and time of your meeting
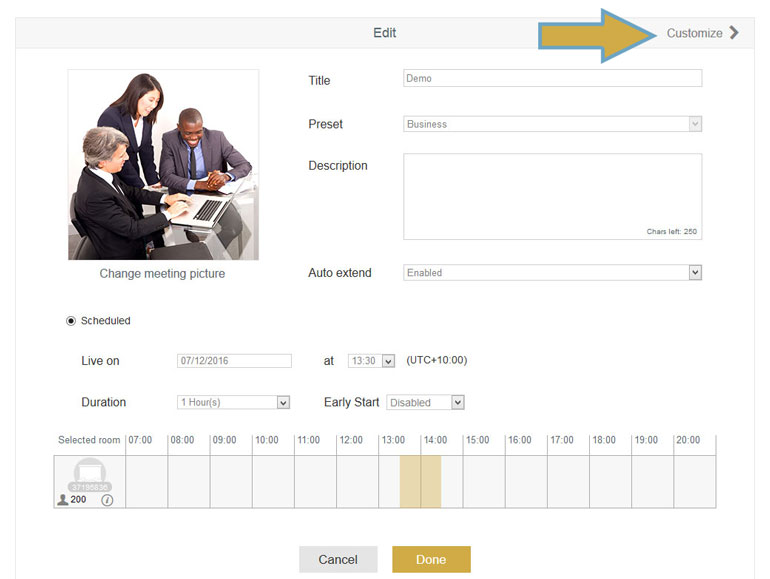
3. Customising your C-Meeting
Select Customise to tailor your meeting settings:
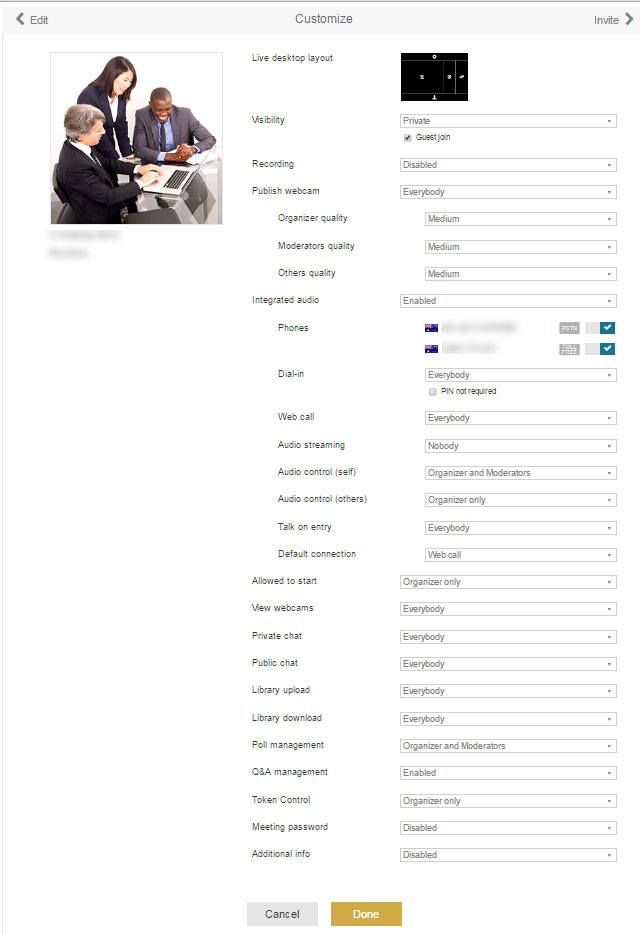
- Desktop Layout – Allows you to tailor your desktop appearance
- Visibility – Decides security levels for your guests
- Guest Join – This tick box needs to be selected if you are inviting participants through their email address
- Recording – Enable, disable your recording capabilities or set to manual
- Publish Webcam/Quality – Select which webcams can be viewed, with quality settings
- Audio – Enable or disable the integrated audio and interactive audio settings
- Chat – Adjust access to the chat function
- Library – Decide which delegates are able to upload and download document
- Polling/Q&A – Decide who can view and take part in your meeting interactions
- Token Control – Enables the capability to delegate hosting the meeting
- Meeting Password – The ability to set a password to restrict entry
Once you have chosen your settings click Invite
4. Inviting guests to your C-Meeting
There are a number of ways to invite participants to your meeting:

- Invite your C-Meeting contacts: when a participant joins a meeting they have the option to become a C-Meeting member, they will then be automatically added to your contact list
- Invite by email: If delegates are not C-Meeting members, you may invite them by email. Simply enter each email address, separated by a semi-colon (;)
- Send the meeting URL: Copy the meeting link into your own invites/documents
When invitees have been entered, click Done.
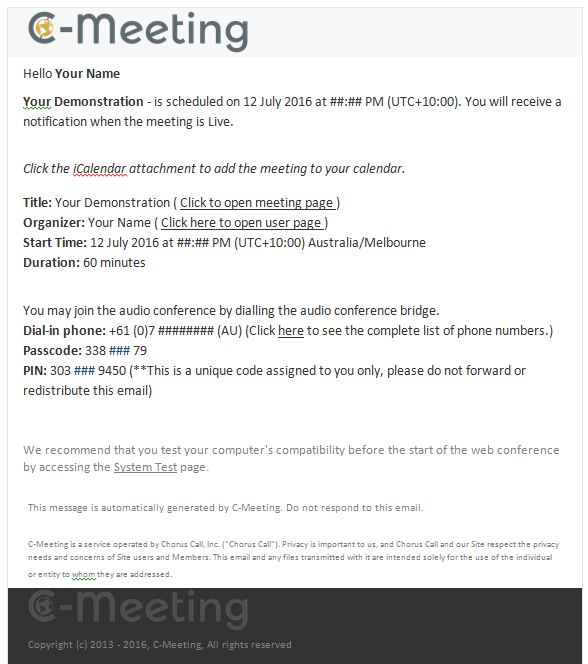
Participants will be sent an email invite which they may save to Outlook calendars.
5. Preparing for your C-Meeting
Now you have created your meeting, you have the opportunity to prepare and make any required additions or alterations.
For example:
- Upload documents/media, comments and polling in advance of your meeting
- Edit your meeting details
- Revisit customising your settings
- Invite additional guests
You are now ready for your C-Meeting!
6. Running your C-Meeting
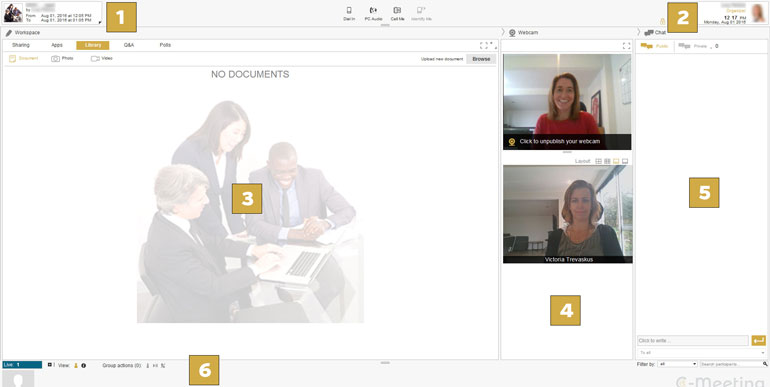
1: MEETING DETAILS
Hover over meeting details to:
- activate recording
- mute guests
- revise meeting information
2: ORGANISER DETAILS
Hover over organiser details to:
- adjust your settings
- revise your meeting information
- end the meeting
3: SHARING AND INTERACTION WORKSPACE
- SHARING: Guests will select this page to view any information being shared.
- APPS: This is where the Host will select the application that can be shared during the meeting.
NB: When logging on for the first time, you will be requested to download a sharing plugin. You will need to close and restart the program once the download has completed.
Once your applications are visible hover over the application/document that you want to share and click ‘share’.
- LIBRARY: Hosts and Guests can upload documents/media to the library for viewing and sharing by clicking ‘browse’ and then selecting the item to be shared. Documents will be available to download from the library.
- Q&A: When a Guest asks a question during a meeting, it will present in the Q&A screen. The Host has the option to either decline, or respond to questions.
- POLLS: The Host has the option to add a poll, and open it to Guests. Once polling is complete, the Host has the option to share the results with the audience.
4: WEBCAM SHARING
5: PRIVATE/PUBLIC CHAT
6: ATTENDANCE INFORMATION
Hover over attendees to:
- access functions for highlighted attendees
- private chat
- passing presenter rights
- selecting a moderator for Q&A and polling
Utilise the attendee toolbar to:
- see how many attendees are online
- see which invited attendees are not online
- mute all participant lines
- disconnect all audio lines
7. Joining a C-Meeting
When you are invited to a C-Meeting you will receive an email invitation. The email will contain the link click here to join the web meeting. Once you click the link, you will be directed to the C-Meeting homepage.
Option One: For non-registered users
Select guest:
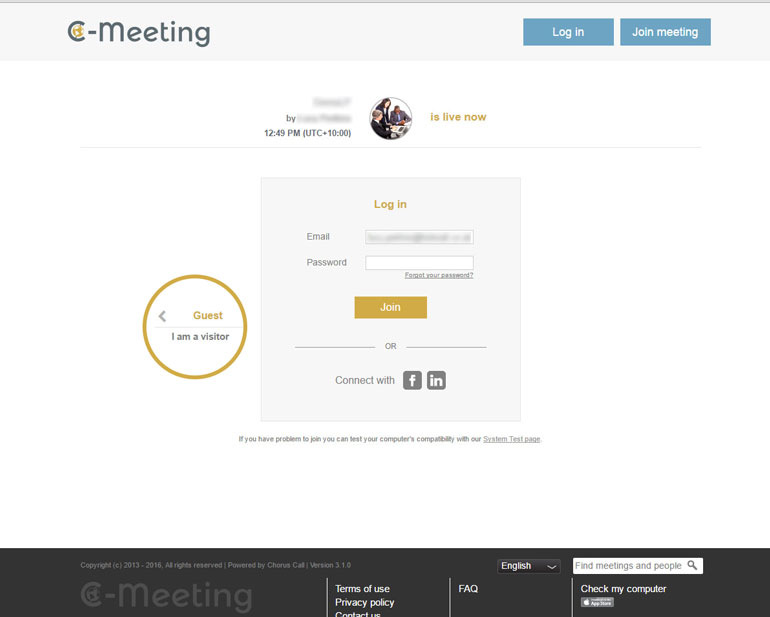
From here you will be prompted to enter your name and then select Join to enter the meeting.
Option Two: For registered users
Log-in to your C-Meeting account and select the Meetings page.
You will be able to see the specific meeting that you have been invited to attend. Select Join.